

Before you hand over a dollar, check three things: the VIN and ownership paperwork, the tires and frame for damage, and a cold-start test ride. Verify the VIN against the seller’s ownership documents and run a history check, look over the tires for cracking and the frame for bent tubing or fresh welds, then start the machine cold and take it for a real ride. Skip any of these three and you’re gambling on a machine you can’t fully evaluate until it’s already yours.
TL;DR:
- Verify the VIN and run a history check to ensure the ATV is not stolen or branded as salvage before inspecting the machine.
- Check the frame, tires, and suspension for signs of impact, wear, or aging, especially focusing on tire DOT dates over five years old.
- Conduct a cold-start test and a thorough test ride to identify engine knocks, hesitation, steering slack, or brake issues that visual inspections might miss.
- Confirm that paperwork matches the ATV, including title, registration, and provincial rules, and avoid machines with branded salvage or missing documentation.
- Consider dealer inspections and known service records to mitigate risks, especially if modifications or mechanical concerns are present.
Table of Contents
- Your Used ATV Checklist Canada Buyers Should Follow at the Listing
- Visual Inspection: Frame, Tires, and Signs of Past Damage
- Mechanical and Fluids Check: What Oil and Belts Reveal
- How to Run a Real Test Ride Before You Buy
- Paperwork, VIN History, and Provincial Registration Rules
- Dealer PDIs and When to Book a Professional Inspection
- Checking Aftermarket Modifications Before You Commit
- Safety Gear That Should Come With the Machine
- Seasonal Riding Limits Across Canadian Regions
- Environmental Rules That Affect ATV Ownership in Canada
- What Actually Matters When You Buy Used
- Buying With Dealer Backing Instead of Rolling the Dice Privately
- Quick Reference: Where to Verify Before You Buy
- Sources
- FAQ
Your Used ATV Checklist Canada Buyers Should Follow at the Listing
A used ATV checklist for Canada works best in order: paperwork first, then the machine, then the price. Rushing this sequence is how buyers end up arguing over a busted CV boot after the money has changed hands.
Run through these steps roughly in this order, whether you’re standing in a dealer’s lot or a stranger’s driveway:
- Match the VIN on the frame or under the seat to the ownership document and run a history check before you touch anything else.
- Walk the exterior for frame damage, mismatched paint, and cracked plastic.
- Check the tires for cracking, uneven wear, and the DOT date code.
- Inspect fluids including oil color, coolant level, and any visible leaks under the machine.
- Look at the electrical system: battery mounting, corrosion, and any spliced wiring.
- Check the driveline: CV boots, drive belt or chain, and clutch engagement.
- Cold-start the engine before the seller warms it up, and listen for knocks or hesitation.
- Take a real test ride covering throttle, brakes, and steering.
- Negotiate using what you found, not just the asking price.
- Confirm paperwork transfer details before you finalize anything.
Some of these steps double as bargaining chips. A tire set nearing the end of its life or a shock showing fluid seepage isn’t just a mechanical note. It’s a dollar figure you can point to when the seller won’t budge on price.
Visual Inspection: Frame, Tires, and Signs of Past Damage
Start with the VIN itself. On most ATVs it’s stamped into the frame near the front suspension or tucked under the seat, though the exact spot varies by model and manufacturer. Look for scratches, re-stamped digits, or a plate that looks like it’s been swapped. Tampered VINs are a hard stop, not a negotiating point.
Move to the frame next. Run your hand along the main rails and look for:
- Bends or ripples in the tubing, which usually mean a rollover or hard impact
- Fresh paint in isolated patches, which often hides repair work rather than a full respray
- Welds that look amateur or don’t match the factory finish
- Cracked mounting tabs where the skid plate or A-arms attach
Tires tell their own story. The manufacture date is molded into the sidewall as a four-digit DOT code, and rubber older than five to ten years degrades even when the tread still looks fine. A full replacement set including labor runs close to C$500, and that number is worth having in your head before you start talking price.
Check suspension by pushing down hard on each corner. Shocks that leak oil, feel spongy, or leave the ride height uneven on one side point to worn components or a machine that’s seen rough terrain without matching maintenance. Grab each front wheel and rock it top to bottom. Play there usually means a worn wheel bearing.
Pro Tip: Bring a small flashlight and get down on your knees for the frame check. Damage hides in shadows under the fenders, and most sellers won’t offer to move the machine for you.
Mechanical and Fluids Check: What Oil and Belts Reveal
Pull the dipstick or check the oil window before you do anything else mechanical. Clean oil looks amber and clear. Metal shavings suggest internal wear, and milky or foamy oil usually means coolant has mixed in, a sign of a blown head gasket or cracked cylinder.
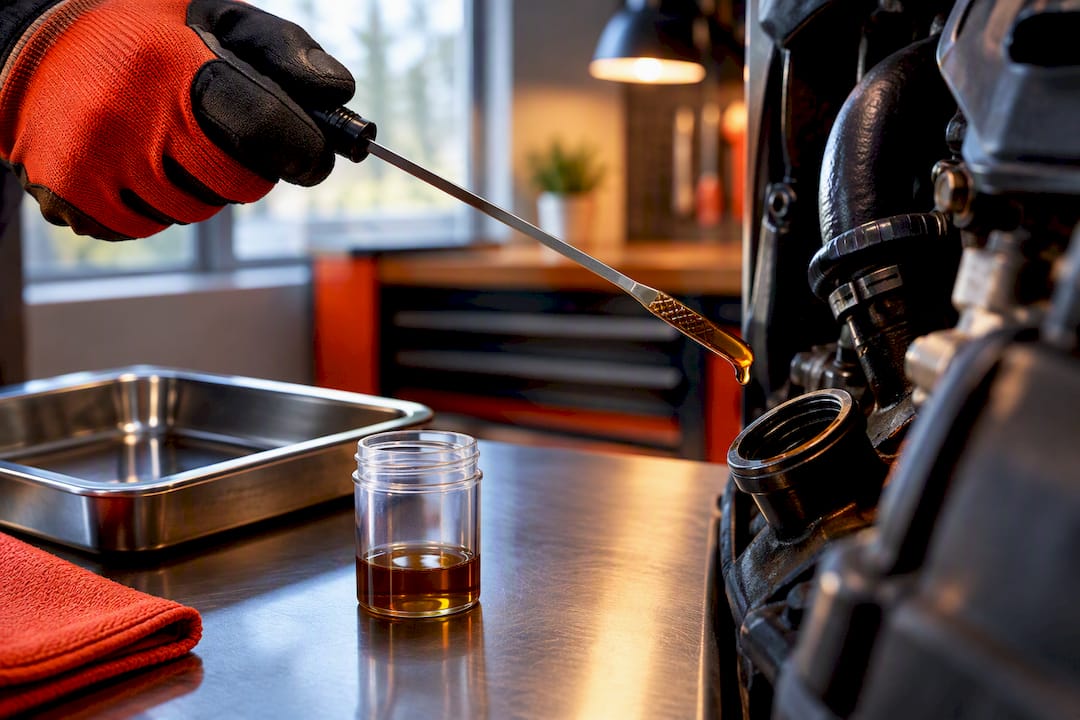
Coolant deserves the same scrutiny. Rusty or oily coolant points to a cooling system that’s been neglected or a machine that’s overheated in the past. Check the reservoir level and look for any residue crusted around hose connections.
Work through the driveline components methodically:
- CV boots: squeeze them and look for cracks or tears that let dirt into the joint
- Drive belt or chain: check for glazing, fraying, or excessive slack
- Clutch or CVT engagement: listen for grinding or delayed pickup when you rev in neutral
- Exhaust: look for rust-through or aftermarket welds that suggest a repair rather than an upgrade
Electrical problems tend to hide in plain sight. Check the battery mount for corrosion around the terminals and make sure it’s actually bolted down, not just resting in the tray. Aftermarket wiring that’s been spliced with electrical tape instead of proper connectors is a red flag for shortcuts elsewhere on the machine. None of these issues are automatic dealbreakers on their own, but a torn CV boot or worn belt is a common expense worth factoring into your offer.
How to Run a Real Test Ride Before You Buy
The test ride separates machines that run fine from machines that just start. Follow this order and don’t skip the cold start, even if the seller insists the ATV “just needs a minute.”
- Arrive unannounced on the engine. Ask the seller not to start it before you get there, and start it yourself, cold.
- Listen for the first two minutes. Knocking, rattling, or blue smoke in this window can reveal problems a warmed-up engine hides completely.
- Test throttle response in neutral, then moving, watching for hesitation or surging.
- Shift through every gear, including reverse, and note any grinding or refusal to engage.
- Brake hard from a moderate speed on flat, open ground and check whether it pulls to one side.
- Check steering play by turning the handlebars slightly with the machine stationary. Excessive slack points to worn bushings or tie rods.
Fifteen to twenty minutes on mixed terrain, gravel, a bit of grass, a small hill if one’s available, tells you more than any amount of staring at the engine bay. If you’re buying from a private seller, stay on terrain you can control and skip anything technical until the machine is legally yours.
Pro Tip: If a seller has already warmed the engine before you show up, ask them to shut it off and wait twenty minutes before you restart it cold. A warm engine masks issues that only show up on a genuinely cold start.
Paperwork, VIN History, and Provincial Registration Rules
Paperwork problems are the reason otherwise-solid ATVs come back to bite buyers months later. Confirm the seller’s name matches the ownership document, then run the VIN through a dedicated history service. In Canada, services like VINAudit can surface theft reports, insurance claims, and salvage or rebuilt branding that never show up on a casual inspection.
A history report costing a modest fee is cheap protection compared to losing a machine to police seizure because it was reported stolen two provinces away.
Provincial rules add another layer. Registration requirements, insurance obligations, and trail permit rules vary by province, and some trail systems won’t let you ride legally without proof of both. Before you commit to a purchase, confirm with your provincial registry that the transfer process is straightforward for this specific machine.
Watch for these paperwork red flags:
- No ownership document, or one that doesn’t match the VIN
- A bill of sale with no VIN listed at all
- A title flagged as salvage, rebuilt, or non-repairable
- A seller who’s reluctant to meet anywhere connected to their own name or address
If a VIN comes back branded salvage or the seller can’t produce a clean title, walk away. No discount makes that risk worth taking.
Dealer PDIs and When to Book a Professional Inspection
A dealer pre-delivery inspection covers ground a private-seller walkaround simply can’t. Dealer PDIs typically verify fluid levels, torque specs, brake function, and recall completion, then document all of it. That paperwork trail matters if you ever need warranty work or have to prove maintenance history at resale.
Before finalizing a private-sale purchase, ask for:
- Service invoices showing regular oil and filter changes
- Evidence any manufacturer recalls have been completed
- A written PDI report if the machine came from a dealer originally
If something feels off, structural cracks, contaminated fluid, paperwork that doesn’t add up, book a pre-purchase inspection with a mechanic who knows ATVs specifically. Budget for immediate post-purchase costs too: fresh fluids, filters, a battery if the old one is questionable, and tires if they’re near the end of their service life.
Checking Aftermarket Modifications Before You Commit
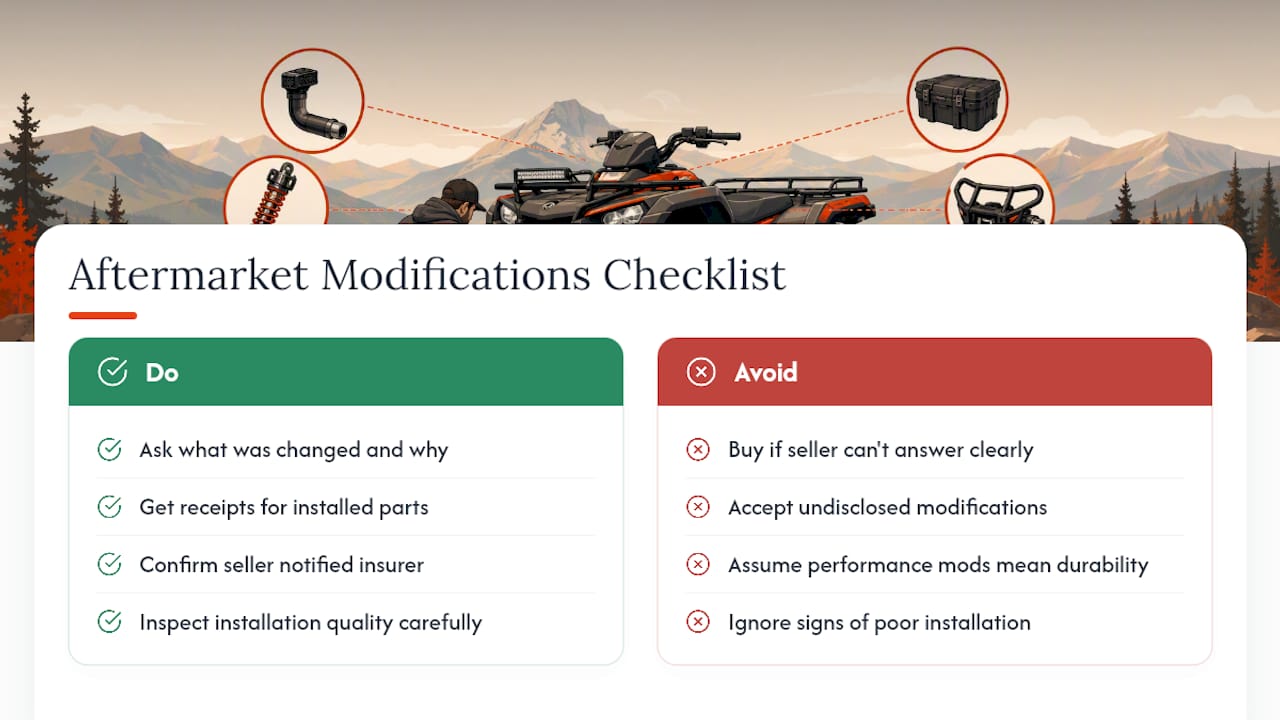
Modified machines aren’t automatically bad buys, but they change the math. A lift kit, aftermarket exhaust, or performance tune can mean the ATV has been ridden harder than stock specs intended, and that changes what you should expect from the drivetrain and suspension.
Ask specifically what’s been changed and why. A seller who upgraded shocks for better trail performance is a different story than one who swapped in an aftermarket CVT clutch to chase top speed. The second scenario usually means more wear on components the factory never designed for that kind of stress.
Insurance is where modifications get expensive fast. Many insurers require disclosure of aftermarket changes, and an undisclosed modification can void coverage entirely after an accident. If you’re buying a modified machine, ask the seller for receipts on the parts installed and find out whether they notified their insurer. If they can’t answer clearly, treat that as a gap you’re inheriting.
Check that modifications were installed correctly, not just installed. A lift kit with mismatched shock lengths, aftermarket wiring that bypasses factory fuses, or a exhaust swap that’s cracked or poorly mounted all point to work done cheaply rather than well. Reversing a bad modification back to stock specs can cost more than the machine saved you at the negotiating table.
If you plan to keep riding the machine as modified, factor replacement parts availability into your decision too. Popular aftermarket brands are easy to source. Obscure ones from a seller’s garage project might not be.
Safety Gear That Should Come With the Machine
An ATV without matching safety equipment is only half a purchase. Before you finalize anything, ask what’s included and inspect it as carefully as the machine itself.
A DOT or ECE-certified helmet should show no cracks in the shell and no crushed foam liner, since impact damage isn’t always visible from the outside. If a helmet is included in the sale, check the manufacture date stamped inside. Foam liners degrade over years even without a crash, and a helmet older than five years is worth replacing regardless of how it looks.
Look for these items and their condition:
- Handguards and brush guards, checking for cracks that reduce protection
- Bumpers and skid plates, since missing ones expose the frame to trail damage
- Any included riding gear like goggles, gloves, or riding boots
Guards matter more in Canada than in flatter riding regions, given how much trail riding involves rock, root, and branch contact. A machine with intact handguards and a solid front bumper has usually been ridden with some care. One stripped of everything but the bare ATV tells you the previous owner either never rode aggressively or already replaced gear that got destroyed, and it’s worth asking which.
Don’t assume included gear fits you. Helmets in particular need to match your head size, and a seller throwing in a helmet as a bonus doesn’t mean it’s the right one for you to wear.
Seasonal Riding Limits Across Canadian Regions
Where you ride shapes what “used” actually means for a given ATV. A machine that spent its life on the wet coastal trails of British Columbia has faced different stress than one used on the dry interior grasslands of Alberta or the rocky Canadian Shield terrain in Ontario.
Coastal and mountain regions like British Columbia see near-year-round riding, but wet conditions accelerate corrosion on exposed metal parts and put more strain on drivetrains working through mud and loose gravel. Check underbody components extra carefully on machines with coastal history.
Prairie provinces often see wider seasonal swings. Summer riding on dry, hard-packed trails is gentler on suspension but harder on tires and air filters from dust exposure. Winter use adds snow riding into the mix, which means checking for aftermarket track systems or studded tires that change how a machine has been used.
Many provinces also restrict ATV use on public land during specific seasons, particularly during fire bans in dry summer months or spring thaw periods when trails are most vulnerable to damage. If you’re buying with plans to ride a specific region’s trail network, confirm current seasonal restrictions with your provincial trail association before assuming year-round access. A machine that looks lightly used might simply have been parked for months at a time due to regional access limits rather than owner neglect.
Environmental Rules That Affect ATV Ownership in Canada
Emissions and noise regulations vary enough across Canada that they’re worth checking before you buy, especially for older machines. Some provinces and municipalities restrict ATV noise levels on public trails, and exhaust modifications that boost sound output can put a machine out of compliance even if it rides perfectly.
Trail access itself is often tied to environmental protection rules rather than just permits. Wetland areas, sensitive wildlife corridors, and certain provincial parks restrict or ban ATV use entirely, and riding in those zones can result in fines regardless of how legally you acquired the machine. If a big part of your riding plan depends on a specific trail system, confirm it permits ATV use before you finalize your purchase.
Fuel and engine standards matter less for used-machine buyers than for new purchases, but it’s still worth knowing whether a machine’s emissions profile affects registration in your province. Some jurisdictions apply extra scrutiny to older two-stroke engines, which are less common in modern ATVs but still show up in older used listings.
None of this should scare you off a used purchase. It just means the checklist doesn’t end at the mechanical inspection. A mechanically sound ATV that can’t legally access the trails you want to ride isn’t the deal it looks like on paper.
What Actually Matters When You Buy Used
Most used ATV advice treats every check with equal weight, and that’s where it goes wrong. A scuffed fender and a branded salvage title are not the same category of problem, but plenty of checklists list them side by side as if they carry equal risk.
Here’s the honest hierarchy: paperwork and VIN verification come first because they’re binary. Either the machine is clean and transferable, or it isn’t, and no amount of mechanical charm fixes a stolen title. Everything mechanical after that is a negotiation, not a pass or fail. Worn tires, tired shocks, a CV boot needing replacement, these are dollar figures, not reasons to walk away.
Where conventional advice falls short is treating the test ride as an afterthought after a long mechanical checklist. In practice, a cold start tells you more in two minutes than an hour of visual inspection. Prioritize it accordingly, and don’t let a seller talk you out of doing it their way instead of yours. Get the paperwork right, get the cold start right, then negotiate everything else with the numbers you found on the walkaround.
— Dirty
Buying With Dealer Backing Instead of Rolling the Dice Privately
Every check in this guide exists because private sales carry risk you have to manage yourself. Buying from an authorized dealer can reduce much of that risk by offering vehicles with pre-delivery inspections and transparent pricing.
That means no guessing about VIN history, no chasing down missing service records, and no wondering whether the seller disclosed every modification. You receive transparent pricing, expert guidance from experienced riders, and options for delivery beyond local pickup. Parts, accessories, and apparel are often available through the same source, keeping warranty support and OEM replacement parts coordinated rather than scattered across marketplace sellers.
If the checklist above feels like more work than you want to take on for a private purchase, browse current inventory and request a quote directly. It’s a straightforward way to get a dealer-backed machine without the paperwork risk this entire guide is built around avoiding.
Quick Reference: Where to Verify Before You Buy
Run the VIN through VINAudit for theft and salvage history, confirm provincial registration and insurance rules through Outdoor Canada’s ATV guidance, and use Dirt Wheels Magazine’s inspection checklist as a mechanical reference. These three cover the checks this article leans on most.
Sources
- Used ATV buying checklist: VIN, theft, registration (VINAudit)
- Atv
- How to buy a used UTV or ATV (Dirt Wheels Magazine)
- 5 things to consider when choosing an ATV for Canadian outdoor adventures (Outdoor Canada)
FAQ
What Should You Check When Buying a Used Quad?
Check the VIN against ownership documents and run a history report, inspect the frame and tires for damage or age, then do a cold start and test ride. Fluid condition, CV boots, and electrical wiring round out the mechanical side, and provincial registration rules matter just as much as the machine itself.
What ATVs Should You Avoid Buying?
Avoid any machine with a branded salvage or rebuilt title, mismatched or missing VIN documentation, or a seller who won’t let you do a cold start. Machines with heavily modified drivetrains and no maintenance records also carry more risk than the price discount usually justifies.
Do You Pay Tax on a Used ATV in Canada?
Yes, most provinces charge sales tax on used ATV purchases, though the exact rate and rules depend on your province and whether you’re buying from a dealer or a private seller. Confirm the specific requirement with your provincial registry before finalizing a purchase, since registration and tax rules vary by province.
What Is the Top-Selling ATV Brand in Canada?
Sales rankings shift year to year and vary by region, so there’s no single fixed answer. What matters more for a used purchase is parts availability and dealer support in your area. Dirtybirdypowersports focuses on CFMOTO machines specifically because of their documented pre-delivery inspection process and nationwide parts support.