

A properly fitted motorcycle helmet sits snug and stable on your head, doesn’t shift when you shake it, positions its front edge roughly one finger-width above your eyebrows, and lets you open your jaw fully without restriction. No sharp pressure points. No numbness. No nose contact. That’s the standard every helmet should meet before you ride, and it’s backed by DOT / FMVSS 218, ECE 22.06, and the Snell Memorial Foundation — the three certifications worth knowing.
Run these three checks right now:
- Head measurement vs. size chart: Measure your head circumference in centimeters and compare it to the manufacturer’s chart. If you’re between sizes, start with the smaller one.
- Roll-and-shake retention check: Fasten the chin strap, grip the chin bar, and try to roll the helmet forward and back. The shell should resist; your skin should move with the liner.
- Cheek-pad yaw/speech test: Fasten the strap and open your mouth as wide as a yawn. Pads should compress but not lock your jaw.
Return the helmet immediately if you feel a single sharp hotspot within the first few minutes, notice numbness anywhere on your scalp, or the shell contacts your nose even after you’ve repositioned it correctly.
Key Takeaways
A correctly fitting motorcycle helmet is snug, stable under shake and push tests, sits one finger-width above the eyebrows, and allows full jaw movement with no sharp pressure points.
| Point | Details |
|---|---|
| Measure in centimeters | Use a soft tape 1 inch above the eyebrows; always use the larger of two readings. |
| Head shape matters as much as size | Round, intermediate, and long-oval profiles determine which models will fit without hotspots. |
| Cheek-pad break-in is limited | Pads compress only 5–15% over 10–20 hours; sharp pain on day one means wrong model, not wrong size. |
| Run stability tests before riding | Roll-and-shake and forward push tests confirm the helmet won’t shift in a crash. |
| Replace after any crash | Impact foam compresses permanently; a helmet that took a hit won’t protect you again. |
Table of Contents
- How does helmet style affect fit?
- How do you measure your head and identify your head shape?
- How to put a helmet on and run the first donning checks
- What stability tests confirm a helmet will stay put in a crash?
- How do you fix the most common helmet fit problems?
- When should you size up, size down, or switch models?
- What do DOT, ECE, and Snell certifications actually mean?
- Quick checklist: keep, return, or buy a different model?
- What we see at the shop
- Gear up right with Dirtybirdypowersports
- Sources
How does helmet style affect fit?
The shell shape, chin-bar geometry, and internal padding layout differ significantly across helmet styles, and those differences change which fit problems you’re likely to encounter.
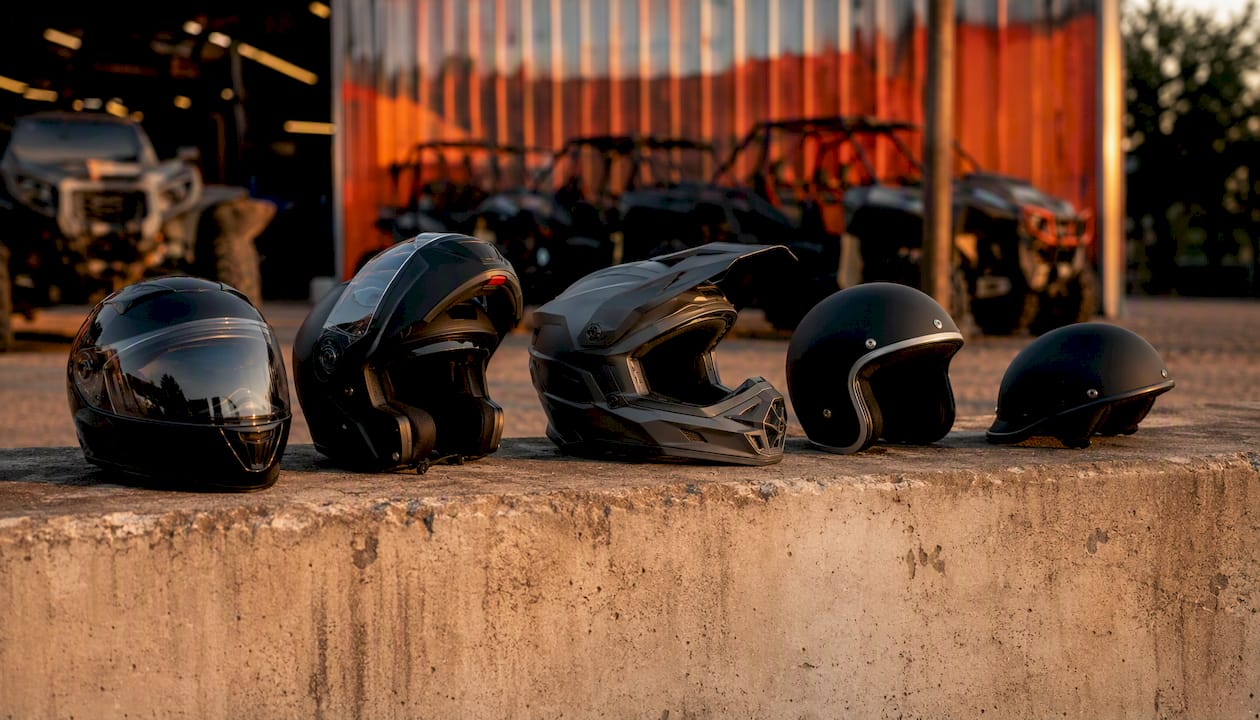
Full-face helmets offer the most stable fit because the chin bar anchors the shell against forward roll. The closed design means cheek-pad and crown contact is consistent all the way around. If your face is longer than average, check front-to-back clearance before committing.
Modular (flip-up) helmets share most of the full-face’s retention benefits when the chin bar is locked down. The hinge mechanism adds weight to the front, so a slightly loose fit feels worse at highway speed than it would in a full-face. Always test with the chin bar closed.
Off-road and dual-sport helmets have a larger eye port and an extended chin bar that sits further from the face. That extra clearance is intentional for goggles and ventilation, but it means cheek-pad contact is the primary retention point. The fit around the cheeks must be snug.
Open-face (3/4) helmets remove the chin bar entirely, so retention depends almost entirely on the crown and cheek pads. They’re more forgiving of slight face-length variation but offer less protection and less stability at speed.
Half helmets cover only the crown. Fit is minimal by design, and retention is almost entirely strap-dependent. They’re the least forgiving of a loose fit because there’s no chin bar or cheek-pad contact to compensate.
Pro Tip: Before committing to any style, confirm the manufacturer offers replacement cheek pads in multiple thicknesses. That one option can turn a “close but not quite” fit into a solid one without a full model swap.
| Style | Retention | Chin clearance | Ventilation | Best use case |
|---|---|---|---|---|
| Full-face | Highest | Minimal | Moderate | Street, track, touring |
| Modular | High (closed) | Moderate | Moderate | Touring, commuting |
| Off-road / dual-sport | High (cheek-led) | Wide | High | Trail, adventure riding |
| Open-face | Moderate | Open | High | Urban, cruiser |
| Half | Low | Open | Highest | Cruiser, short trips |
How do you measure your head and identify your head shape?
Getting the circumference right is step one. Getting the shape right is what separates a helmet that fits from one that just goes on your head.
Step-by-step measurement
- Grab a soft measuring tape. No tape? Use a piece of string and measure it against a ruler afterward.
- Stand in front of a mirror. Place the tape about 1 inch (2.5 cm) above your eyebrows, level with your ears, and wrap it around the widest part of the back of your skull.
- Read the measurement in centimeters. Measure twice and use the larger number — heads are rarely perfectly symmetrical.
- Take that centimeter figure to the specific manufacturer’s size chart. An “M” from one brand may be a 57 cm shell; another brand’s “M” may be 58 cm. The metric number is the truth; the letter size is just a label.
Identifying your head shape
Look straight down at the top of your head in a mirror, or take a photo from directly above. You’re looking at the ratio of front-to-back length versus side-to-side width.
- Round oval: Width and length are nearly equal. The skull looks close to circular from above.
- Intermediate oval: Slightly longer front-to-back than side-to-side. This is the most common profile among U.S. riders, and most helmet manufacturers design their default shell around it.
- Long oval: Noticeably longer front-to-back than wide. Riders with this profile often feel pressure at the forehead and rear of the skull in helmets built for intermediate-oval heads.
Head shape matters as much as circumference. A helmet sized correctly for your circumference but built for the wrong profile will create pressure points that no amount of break-in time will fix. If you’re between profiles, try both and run the stability tests before deciding.
Record your measurement and shape before shopping. A 57 cm intermediate-oval head is a specific data point — bring it to the store or use it to filter online size charts.
How to put a helmet on and run the first donning checks
Putting a helmet on correctly takes about 30 seconds and catches most obvious mismatches before you’ve ridden a single mile.
- Spread the straps wide and tilt the helmet slightly forward as you lower it onto your head. Don’t jam it straight down — you’ll catch the liner on your ears.
- Check the front edge position. The shell’s front rim should sit roughly one finger-width above your eyebrows. Too low and it blocks your sightline; too high and the crown padding isn’t contacting your skull correctly.
- Fasten the chin strap. Slide two fingers (flat, not stacked) under the strap once fastened. You should feel light resistance. If the strap is loose enough to fit your whole hand, it’s too slack. If you can’t fit two fingers at all, it’s too tight and will pull the helmet down, shifting cheek-pad pressure.
- Check cheek-pad contact. Both pads should touch your cheeks evenly. If one side has a gap, the helmet may be sitting off-center or the internal profile doesn’t match your skull.
- Align the eye port. Your eyes should sit near the center of the opening. If the top of the port cuts into your field of vision or the bottom is uncomfortably close to your nose, recheck the front-edge position first.
- Wear it for at least 10–20 minutes. In-store, that means sitting with it on while you browse or talk to staff. At home after an online order, wear it around the house. Five practical tests — wearing time, cheek-pad contact, head shake, roll-off, and a 20-minute comfort check — reliably separate normal snugness from a shape mismatch.
The scalp-movement check is easy to overlook: when you move the helmet slightly, your skin should move with it. If the shell slides freely over your scalp, the fit is too loose regardless of what the size chart says.
What stability tests confirm a helmet will stay put in a crash?
A helmet that feels fine sitting still can still fail in a crash if retention is off. These tests simulate the forces that matter.
- Roll-and-shake test: Strap fastened, grip the chin bar with both hands and try to roll the helmet forward over your face, then backward. A passing result: the shell resists, and your skin moves with the liner rather than the shell sliding independently. This is the standard in-field retention check alongside the roll-off test.
- Forward push test: Place both palms on the sides of the helmet and push forward firmly. If the shell slides forward and the rear of the liner lifts off your skull, the helmet is too large or the strap is too loose. Don’t ride with a helmet that fails this test.
- Cheek-pad jaw test: Open your mouth as wide as a full yawn. The cheek pads should compress noticeably but your jaw should move freely. If the pads lock your jaw, they’re too thick for this model. If you feel no compression at all, they’re too thin and the helmet may rotate.
- 15–20 minute hotspot watch: Keep the helmet on and wait. A pressure point that appears within the first few minutes and sharpens over time is a shape mismatch, not a break-in issue. A mild, even snugness that softens slightly as the foam warms to your head is normal.
Pro Tip: Repeat the shake and roll tests while wearing your usual riding glasses or sunglasses, and with any balaclava or thin cap you normally use. Both can alter cheek-pad contact and strap tension enough to change the result.
How do you fix the most common helmet fit problems?
Most fit problems have a clear cause and a specific fix. Guessing wastes time and money.
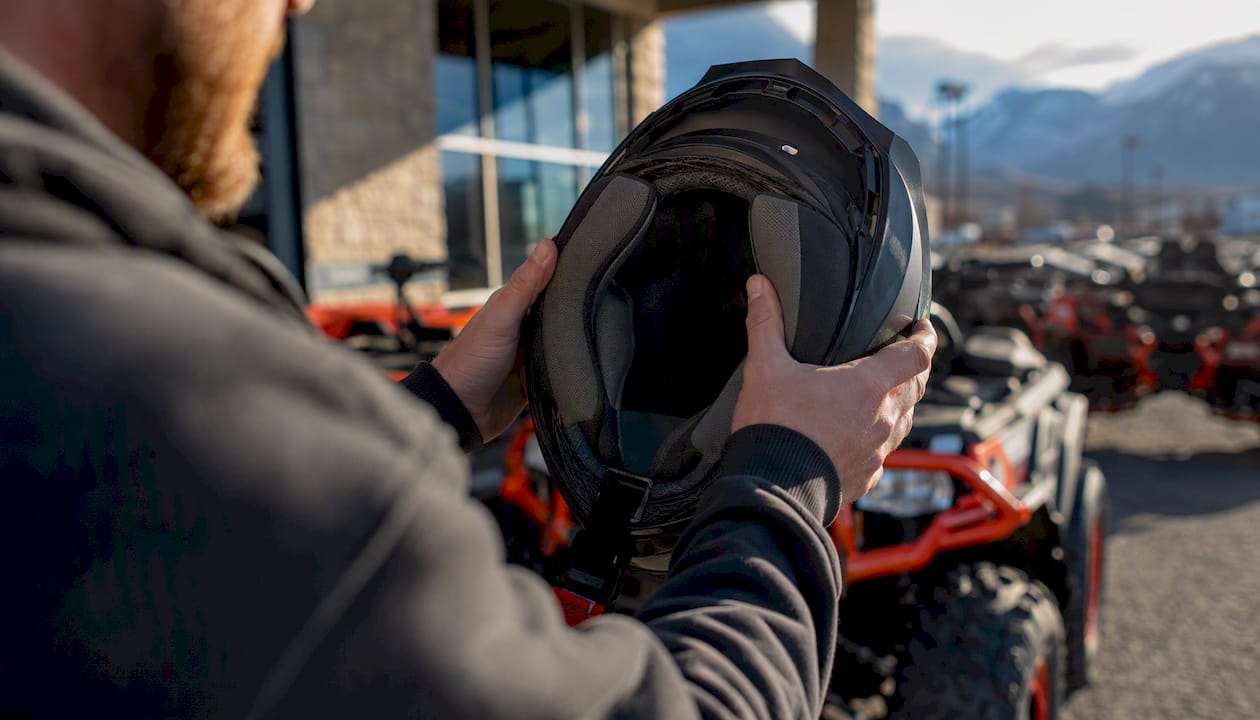
Cheek-pad pain
The cause is almost always one of three things: pads that are too thick for your face width, an internal profile that’s wrong for your skull shape, or a helmet that’s simply one size too small. Cheek-pad foam compresses roughly 5–15% over the first 10–20 hours of wear, so mild snugness on day one is expected. Pain that’s sharp enough to make you want to take the helmet off after five minutes is not a break-in issue — it’s a fit issue.
Fix sequence: try thinner replacement pads first (if the manufacturer offers them), then try wearing a thin skull cap to redistribute pressure. If neither works, the internal profile is wrong and you need a different model.
Stat to remember: Cheek pads compress only 5–15% over 10–20 hours. If the pain is severe on day one, no amount of riding will fix it.
Helmet touching your nose
Reposition first. The front edge should be one finger-width above your eyebrows — if it’s sitting too low, the chin bar will crowd your face. If nose contact persists after correct positioning, the model doesn’t have enough front-to-back clearance for your face length. Check strap tension next (over-tightening pulls the shell down). If both are correct and the nose contact remains, switch to a model with a longer front-to-back interior dimension.
Hotspots and pressure points
A sharp spot that appears within the first few minutes almost always means the helmet’s internal shape doesn’t match your skull. This is a model problem, not a size problem. Swapping to a larger size in the same model will relieve the pressure point but introduce looseness and retention failure. Switch models.
Document the location: forehead pressure usually means the shell is too round for a long-oval head; temple pressure often means the opposite. That information tells you which internal dimension to look for in the next model.
Helmet moves at speed
If the shell slides forward under wind pressure or when you tilt your head down, it’s too large or the strap is too loose. Tighten the strap to the two-finger rule first. If the movement persists, the shell is too large. Do not ride with a helmet that shifts at speed.
Pro Tip: Write down the exact location of any pain or pressure: forehead, left temple, right cheekbone, crown. That map tells you which internal dimension is mismatched and saves you from trying every helmet on the wall.
When should you size up, size down, or switch models?
The metric measurement is your anchor. Letter sizes (S, M, L, XL) vary by brand, so always cross-reference your centimeter measurement against the specific manufacturer’s chart rather than assuming your usual letter size carries over.
- Size down when your measurement falls between two sizes and the smaller one passes all stability tests. Padding beds in; a slightly snug fit on day one is correct.
- Size up when you have persistent hotspots or cheek pinching across multiple sessions in the same model at the smaller size, AND the larger size still passes the roll-and-shake test.
- Do not size up to relieve cheek pressure. Cheek pads are replaceable. Sizing up to fix cheek pain trades one problem for a worse one: a shell that’s too large fails retention tests and can shift forward in a crash.
| When to size up | When to swap models |
|---|---|
| Smaller size fails roll-and-shake | Sharp hotspot appears within minutes in multiple sizes |
| Smaller size causes numbness after 20 minutes | Nose contact persists after repositioning and strap adjustment |
| Strap cannot reach two-finger tension | Long-oval head in a round-oval shell (or vice versa) |
| Crown padding doesn’t contact skull | Replacement pads not available for this model |
What do DOT, ECE, and Snell certifications actually mean?
Every helmet you ride in should carry at least one recognized certification. Here’s what each one signals.
DOT / FMVSS 218 is the U.S. federal standard administered by NHTSA. It’s a self-certification system: manufacturers test their own helmets and apply the DOT sticker. Look for the sticker on the rear of the shell. A genuine DOT helmet has a thick impact-absorbing liner (typically 1 inch or more), a sturdy chin strap with riveted hardware, and a weight that reflects real foam density. Watch for novelty helmets that carry a DOT sticker but lack proper foam thickness or secure chin strap hardware — they’re noncompliant and provide minimal protection.
ECE 22.06 is the current European standard and is widely considered more stringent than DOT because it requires third-party lab testing before a helmet reaches the market. Many U.S. riders seek out ECE-certified helmets for that reason, though ECE certification is not legally required in the U.S.
Snell Memorial Foundation certification is voluntary and involves independent testing at Snell’s own lab. Snell-certified helmets typically exceed DOT minimums and are common in track and racing environments. The Snell M2020 standard is the current version for street helmets.
When to replace a helmet
Replace after any crash that involved head contact, even if the shell looks undamaged. Impact foam compresses permanently and won’t protect you a second time. Beyond crashes, most manufacturers recommend replacement every 5–10 years depending on use and storage conditions. Liner foam degrades over time, which changes both fit and protection. If the liner feels noticeably softer or the fit has become looser without pad swaps, the helmet has aged out.
Basic care: Hand-wash the liner and cheek pads with mild soap; never machine-wash. Clean the shell with mild soap and water. Avoid petroleum-based cleaners, which degrade EPS foam. Store away from direct sunlight and heat. A used helmet from an unknown owner carries unknown crash history — treat it as unverifiable and avoid it.
Quick checklist: keep, return, or buy a different model?
Use this after your first 15–20 minute wear session.
Keep the helmet if:
- Passes the roll-and-shake and forward push tests
- Cheek pads allow a full yawn without locking your jaw
- No sharp hotspots after 15–20 minutes of wear
- Eye port is centered; front edge sits one finger-width above eyebrows
- Strap holds at two-finger tension without pulling the shell down
Return or swap size if:
- Single sharp hotspot appears within the first few minutes
- Numbness anywhere on the scalp
- Helmet touches your nose at rest after correct repositioning
- Helmet slides forward when pushed or during head tilt
Buy a different model if:
- Shape mismatch persists across two sizes (long-oval head in a round-oval shell)
- Replacement pads in the correct thickness are not available for this model
- Nose contact continues after repositioning and strap adjustment across sizes
For online buyers: Measure carefully, order two adjacent sizes if the retailer’s return policy makes it easy, and run through this checklist the day the helmets arrive. Don’t ride on either until you’ve completed the 15–20 minute wear test.
What we see at the shop
The most common mistake riders bring to us isn’t buying the wrong size — it’s buying the wrong shape. Someone measures 57 cm, orders a size M, and then spends three rides wondering why their forehead hurts. Nine times out of ten, the helmet is an intermediate-oval shell on a long-oval head. The circumference is right; the profile is wrong.
The second most common issue is cheek-pad confusion. Riders assume that if the cheeks feel tight on day one, they need a bigger helmet. That assumption leads to a shell that passes the size chart but fails the roll-and-shake test. Thinner replacement pads almost always solve the cheek issue without touching the shell size.
At Dirtybirdypowersports, we walk riders through the shape check before anything else. Once you know your profile, the model shortlist gets much shorter and the try-on process gets faster. If you’re unsure about your measurement or want a second opinion on a helmet you’ve already bought, reach out to the team — we’d rather help you get it right before you ride than after.
Gear up right with Dirtybirdypowersports
A helmet that fits is the foundation, but the right riding setup goes further. At Dirtybirdypowersports, we stock riding accessories built for real conditions — including under-helmet comfort layers that help with fit adjustment and moisture management on longer rides. Whether you’re gearing up for trail riding or daily commuting, the Dirtybirdypowersports shop has what you need at MSRP with no markups.
Sources
- Choose the Right Motorcycle Helmet | NHTSA
- Motorcycle Helmet Size Guide | Harley-Davidson USA
- Should Motorcycle Helmet Cheek Pads Feel Painful? – Cyril Helmets
- Helmetsadvisor
- How Tight Should a Motorcycle Helmet Be? Five Tests
Recommended
- TF281201.F-I | CFMOTO UForce U10 PRO Front Forward Control Arms (Pre-I – Dirty Birdy Powersports
- TF281201.F | CFMOTO UForce U10 PRO Front Forward Control Arms (Non-Ins – Dirty Birdy Powersports
- ATV-UTV TEK V-Grip - Single – Dirty Birdy Powersports
- ATV-UTV TEK Clearview / Elite Rearview mirror adapter - Pro Fit Mount – Dirty Birdy Powersports