

Ride only on designated trails, yield to non-motorized users, wear a DOT-compliant helmet, pack out everything you pack in, and carry your permits. That’s the short version. Every rule below exists because trails that get abused get closed, and closed trails hurt every rider in the province.
Quick checklist before you ride:
- Stay on marked, designated trails only
- Yield to hikers, cyclists, and horses
- Wear a DOT-certified helmet and full PPE
- Pack out all garbage; leave gates as you found them
- Carry required permits and check trail status first
- Zero alcohol or drugs, no exceptions
- Know your hand signals and group roles before you leave the trailhead
Key Takeaways
Proper ATV trail etiquette in Canada requires staying on designated trails, yielding to non-motorized users, wearing certified protective gear, carrying required permits, and actively stewarding the trails you ride.
| Point | Details |
|---|---|
| Stay on designated trails | Never create new tracks, cut switchbacks, or ride on wet/soft surfaces. |
| Yield correctly | Stop and shut off your engine for horses; slow and move right for hikers and cyclists. |
| Wear certified PPE | A DOT or Snell helmet, eye protection, boots, gloves, and long clothing are non-negotiable. |
| Carry permits and check status | Purchase trail passes before you leave and verify seasonal closures the day before. |
| Steward the trail actively | Pack out all garbage, fix small ruts when you see them, and report damage to your provincial club. |
Table of Contents
- 1. Hand signals and group riding keep everyone safe
- 2. Yielding on the trail: who stops and who goes
- 3. Designated routes, permits, and how to check trail status in Canada
- 4. Protecting the trail: stream crossings, ruts, and pack-in/pack-out
- 5. Safety and legal basics for Canadian riders
- 6. What to do before you ever hit the trail
- 7. Behaviors that get trails closed
- 8. The dealer-backed pre-ride checklist from Dirtybirdypowersports
- Why etiquette is the real access strategy
- Useful resources for Canadian ATV riders
- Sources
1. Hand signals and group riding keep everyone safe
Clear communication is the difference between a smooth group ride and a dangerous chain reaction. Before anyone starts an engine, assign two roles: a trail leader and a tail rider. The leader sets the pace, watches for hazards, and makes route decisions. The tail rider stays at the back, confirms no one is left behind, and signals the group to stop if a rider goes down or gets separated, helping maintain group safety.
Common hand signals every rider in your group should know:
- Arm raised, fist closed — Stop
- Arm extended, palm down, pumping — Slow down
- Arm pointing down, finger extended — Hazard on that side of the trail
- Arm raised, circular motion — Regroup ahead
- Arm extended, hand flat — Single file
Following distance matters as much as the signals themselves. On a narrow single-track, keep at least three to four seconds of visual gap between machines. On a wide logging road, that gap can stretch to five or six seconds, giving you time to react to sudden stops without a rear-end collision.
The OFATV Trail Etiquette guidelines also recommend removing your helmet when speaking directly to other trail users, including hikers and equestrians. It sounds like a small thing, but it signals respect and makes you look far less intimidating.
Pro Tip: Run a two-minute pre-ride briefing at the trailhead. Confirm hand signals, assign leader and tail, and agree on a regroup point every 10–15 minutes. If a rider gets separated, the tail rider stops and waits while the leader holds position at the next regroup point. Never split the group further trying to find someone.
2. Yielding on the trail: who stops and who goes
The general rule is simple: motorized yields to non-motorized, and downhill yields to uphill. In practice, that breaks into a few specific scenarios.
Meeting hikers: Slow to a near-stop, move to the right side of the trail, and let them pass. A quick wave and a calm engine idle go a long way. Tread Lightly! recommends keeping speed and noise low whenever you’re near people on foot.
Passing cyclists: Signal your approach early, reduce speed significantly, and give them as much lateral space as the trail allows. Cyclists can be startled by engine noise; a slow, predictable pass prevents accidents.
Encountering horses: This one requires the most care. Pull to the downhill side of the trail, stop completely, and shut off your engine. Then remove your helmet. A helmeted rider looks alien to a horse; a bare-headed human is far less likely to cause a spook. Speak calmly to the rider and wait for their signal before restarting. The OFATV guidelines specifically call out this helmet-removal step because it works.
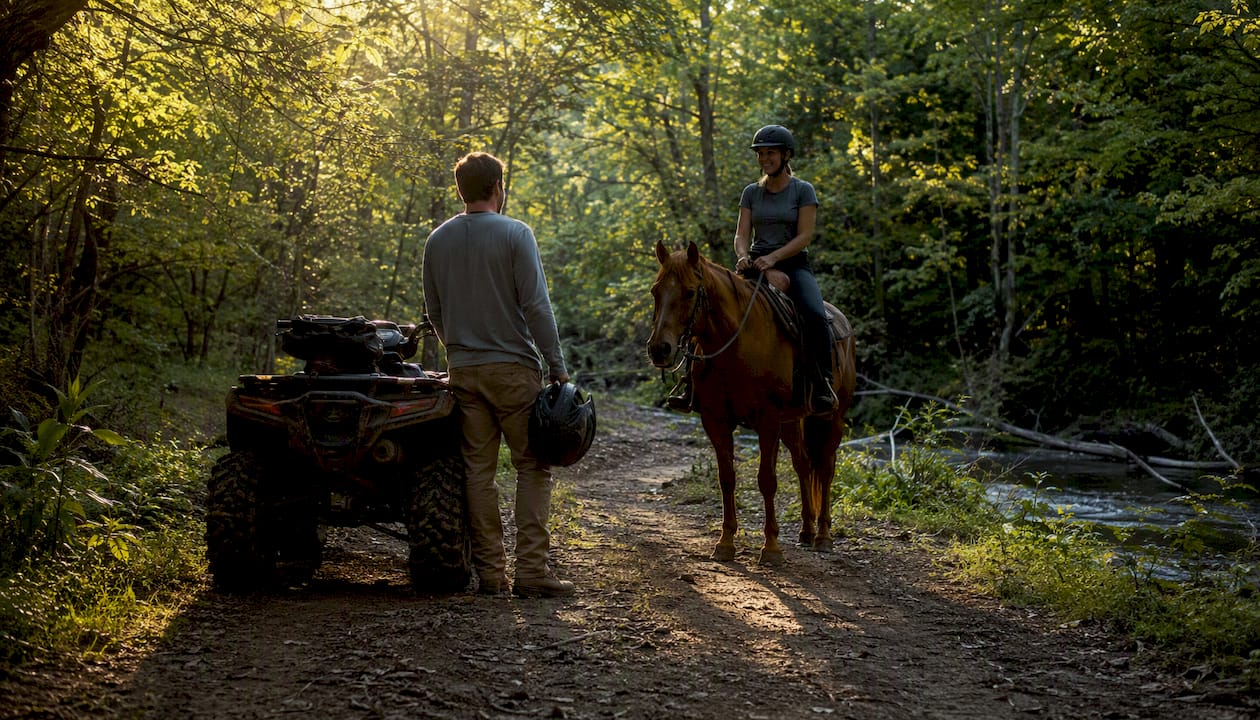
Meeting uphill riders: The uphill rider has the right of way. Pull to the side, stop if the trail is narrow, and let them through. Momentum is harder to rebuild going uphill, and stopping on a steep grade is a stability risk.
Near trailheads, campgrounds, or any area with foot traffic, drop your speed to a crawl and keep RPMs low. Sound carries farther in forested terrain than most riders expect.
3. Designated routes, permits, and how to check trail status in Canada
Ride only where ATVs are explicitly permitted. Trespassing on private land or creating new tracks on Crown land can lead to trail closures affecting all users. Landowner complaints carry real weight with provincial authorities, and a single incident can trigger access reviews that affect hundreds of kilometers of trail.
Before any ride, work through this access checklist:
- Check provincial trail maps via your regional ATV association (OFATV in Ontario, ATVBC in British Columbia, and equivalent bodies in other provinces)
- Purchase required trail passes through the OFATV permits portal or your provincial equivalent before you leave home
- Verify seasonal status — many trails close during spring thaw or after heavy rain; call or check online the day before
- Respect private land boundaries and leave gates exactly as you found them, open or closed
- Note any posted restrictions at trailheads and follow them without exception
Trail access in Canada is governed at the provincial level, which means rules vary. What’s open in Ontario may be closed in BC, and vice versa. The American Trails OHV management guidelines make the same point for North American OHV recreation broadly: effective route planning requires local knowledge, not assumptions carried over from another region.
| Trail type | Typical permission required | Where to verify |
|---|---|---|
| Designated public ATV trail | Trail pass or permit | Provincial ATV association portal |
| Crown land (undesignated) | Varies by province; often restricted | Provincial land-use office |
| Private land | Explicit landowner permission | Direct contact with landowner |
| Municipal shared-use trail | Posted rules; sometimes permit | Municipal parks or recreation office |
4. Protecting the trail: stream crossings, ruts, and pack-in/pack-out
Every tire track on a soft surface is a potential erosion point. The ATVBC Trail Etiquette guidelines are direct about this: stay on designated, marked trails, never create new paths or shortcuts, and pack out everything you packed in.
Practical steps that actually protect the trail:
- Cross streams at designated fords or bedrock crossings, approaching at a 90-degree angle to minimize bank disturbance; use bridges whenever they’re available
- Avoid spinning your tires in mud or soft ground; if you’re spinning, you’re digging, and digging creates ruts that widen into washouts
- Stay off wet or soft trails during and after rain; the repair cost of a single wet-weather ride can take a volunteer crew days to fix
- Don’t cut switchbacks — the shortcut destroys the drainage design that keeps the main trail intact
- Pack out every piece of garbage, including food scraps, packaging, and anything else you carried in
Pro Tip: If you spot a small rut or a blocked drainage dip while riding, stop for two minutes and fix it. Clear the drain with a stick, kick loose soil back into the rut, or redirect water off the trail surface. These micro-repairs, done consistently by riders, are what keep trails open. The OFATV guidelines explicitly encourage this kind of on-the-spot stewardship.
Erosion and habitat loss are the two complaints that most reliably trigger permanent trail closures. Landowners and conservation authorities respond to visible damage, and once a closure order is issued, reopening a trail takes years of advocacy and restoration work.
5. Safety and legal basics for Canadian riders
Protective gear and age rules aren’t suggestions. The ATV Safety Institute is clear: wear a DOT-compliant helmet and full protective clothing, never ride under the influence, never carry a passenger on a single-rider ATV, and supervise riders under 16.
Required and strongly recommended PPE:
- DOT or Snell-certified helmet — the single most important piece of gear
- Goggles or a full-face shield — debris and dust cause serious eye injuries
- Over-the-ankle boots — ankle and foot injuries are among the most common in ATV crashes
- Long pants and long sleeves — abrasion protection in a fall
- Gloves — grip and hand protection
- Dust mask — on dry, dusty trails, inhaled particulate is a real health concern
| Safety item | Why it matters |
|---|---|
| DOT/Snell helmet | Reduces severe head injury risk in crashes |
| Eye protection | Blocks debris, dust, and UV on open trails |
| Over-the-ankle boots | Protects feet and ankles from crush and twist injuries |
| Gloves | Prevents hand abrasions; improves grip in wet conditions |
| Supervision for under-16 riders | Provincial law in most Canadian provinces |
| No passengers on single-rider ATVs | Machine balance and control are designed for one person |
Zero tolerance for alcohol and drugs is both a legal requirement and a survival rule. Reaction time and judgment degrade fast, and trail hazards appear without warning.
Pro Tip: Check your helmet’s certification label inside the shell before every season. DOT certification is printed on a sticker; if it’s faded, missing, or the helmet has taken a hard impact, replace it. A helmet that’s been in a crash may look fine but no longer provides rated protection.
6. What to do before you ever hit the trail
Preparation prevents the problems that ruin rides and close trails. The ATV Safety Institute recommends completing maintenance checks, securing correct permits, and understanding local rules before departure.
Pre-ride checklist:
- Maps and permits — download offline trail maps and purchase required passes the night before
- Machine inspection — check tire pressure, fluid levels, brakes, lights, and throttle response
- Fuel and oil — top up and carry extra fuel for remote routes
- Tool kit — tire plug kit, tow strap, basic hand tools, zip ties
- First aid kit — at minimum a compact wilderness kit with a tourniquet and wound closure strips
- Communication device — a charged phone plus a satellite communicator (SPOT or Garmin inReach) for areas without cell coverage
- Route plan shared with someone at home — tell them your trailhead, planned route, and expected return time
For training, the ATV RiderCourse offered through the ATV Safety Institute combines online modules with hands-on skills practice. Some dealers include it with new-vehicle purchases. Provincial clubs like OFATV and ATVBC also run rider education programs specific to Canadian trail conditions.
Before you leave, write your route plan and emergency contacts on paper and leave it with someone reliable. A satellite communicator is worth every dollar on a multi-day ride in BC’s backcountry, where cell coverage disappears within the first kilometre off the highway.
7. Behaviors that get trails closed
Most trail closures trace back to a short list of repeated mistakes. Knowing them is the first step to not being the rider who costs your community access.
Common mistakes and how to correct them:
- Trespassing on private land — if you realize you’ve crossed a boundary, stop, turn around, and if possible, speak to the landowner directly to apologize and offer to repair any damage
- Loud or modified exhausts — Tread Lightly! is explicit: never tamper with spark arrestors, and keep RPMs low near homes and campgrounds; sound carries farther in forested terrain than riders expect
- Widening trails by riding around obstacles — ride through the obstacle or stop; going around it starts a new track that erodes into a secondary trail
- Riding wet or soft trails — if the trail is visibly saturated, turn back; the damage done in one pass can take months to repair
- Riding without permits — a single enforcement encounter can result in fines and permit revocation for your whole group
- Cutting switchbacks — destroys drainage and accelerates erosion on the main trail
Pro Tip: If you’re riding with a novice, assign them a position directly behind the leader, not at the tail. That way the most experienced rider in front can set a pace the novice can match, and the tail rider can watch for signs of fatigue or hesitation. A novice at the tail with no one behind them to notice a problem is a setup for an incident.
When enforcement does arrive, it typically comes in the form of permit checks by conservation officers or trail wardens. Repeated complaints from landowners or municipalities can escalate to seasonal closures, permanent reroutes, or full trail decommissioning. The community pays for one rider’s bad decision.
8. The dealer-backed pre-ride checklist from Dirtybirdypowersports
At Dirtybirdypowersports, riders sell to riders. Every machine that leaves the shop in Squamish, BC, goes out with a recommendation to run through this checklist before the first trail ride and before every multi-day trip after that.
Mechanical and accessory checks:
- Tire pressure — check cold pressure against the manufacturer spec; under-inflated tires on rocky terrain cause pinch flats and handling problems. Tires like the Braven Hellhound Uber XOR radials are designed for Canadian trail conditions, but correct pressure still matters
- Spark arrester — inspect for blockage or damage; a clogged arrester is a fire risk and a legal issue in most provinces
- Lug hardware — torque wheel lugs to spec; vibration loosens them faster on rough terrain than most riders expect
- Mirrors and lighting — quick visual check that mirrors are secure and lights function; a UTV rearview mirror gives you group awareness without turning your head on technical sections
- Dust mask — pack one for every rider; on dry BC interior trails, dust exposure over a full day is significant
- Tie-downs and cargo — if you’re hauling gear, check that every strap is rated and secured before you move
For towing your ATV to the trailhead, a diesel performance and prep checklist for your tow vehicle is worth running through before a long haul, especially on mountain routes.
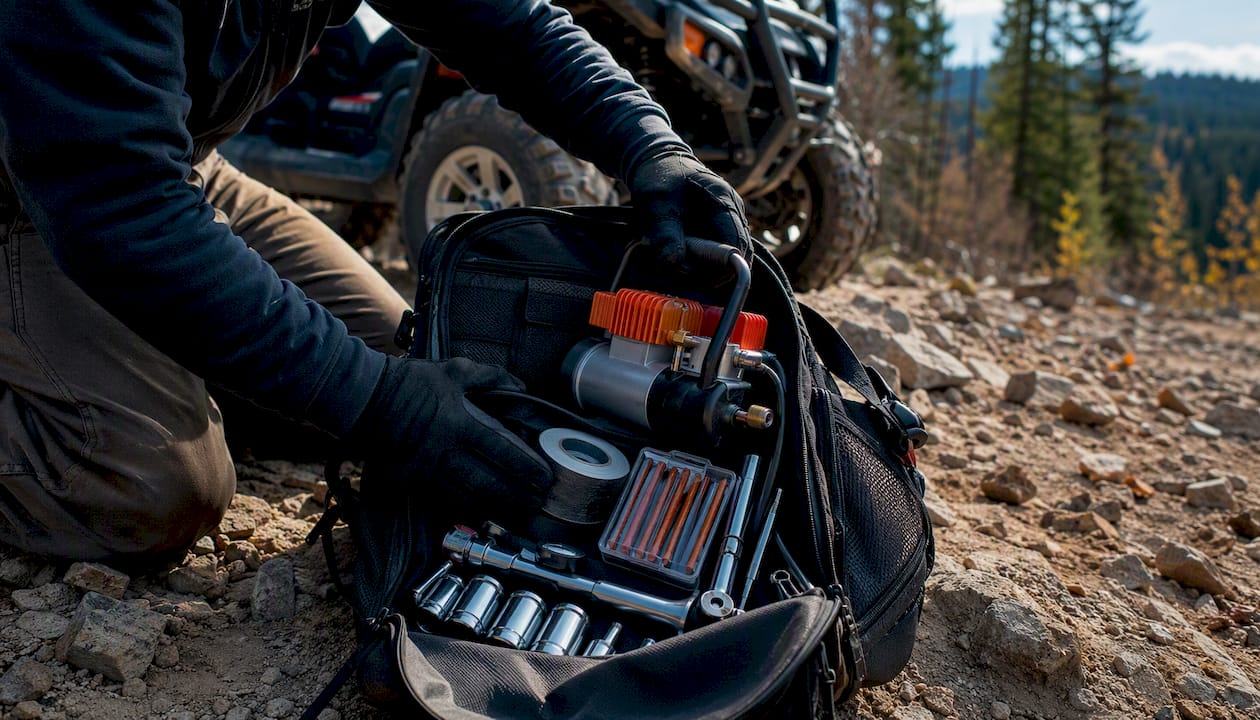
Pro Tip: For multi-day rides, pack a compact repair kit: tire plug kit, a small air compressor, spare brake lever, zip ties, duct tape, and a basic socket set. Add a spare drive belt if your machine uses one. The goal isn’t to rebuild the machine on the trail — it’s to get back to the truck under your own power.
Why etiquette is the real access strategy
Trail access in Canada isn’t guaranteed. It’s earned, ride by ride, through the behavior of every person on a machine. The OFATV guidelines put it plainly: a single instance of poor etiquette can jeopardize access for the entire community.
At Dirtybirdypowersports, we see this play out in real terms. Riders who take the ATV RiderCourse, run pre-ride checklists, and treat other trail users with basic courtesy have fewer incidents and longer access to the trails they love. The riders who skip the prep and ignore the rules are the ones calling us frustrated because their favorite trail just got closed.
The mindset shift that actually works isn’t “follow the rules to avoid a fine.” It’s “treat the trail and everyone on it the way you’d want to be treated on your best riding day.” That shift changes how you approach a muddy section, how you slow down near a hiker, and how you respond when you see someone else making a mistake.
Get involved with your local club. OFATV, ATVBC, and provincial equivalents run volunteer trail days where riders do the maintenance work that keeps access alive. Showing up once a season does more for trail access than any amount of social media advocacy.
Useful resources for Canadian ATV riders
Every rider in Canada should bookmark at least a few of these before their next season:
- ATVBC Trail Etiquette Brochure — BC-specific trail ethics, stream crossing guidance, and pack-in/pack-out rules in a printable format
- OFATV Trail Etiquette & Environmental Guidelines — Ontario’s primary etiquette document covering shared-use trail principles, hand signals, and community stewardship
- OFATV Permits Portal — purchase Ontario trail passes and check permit requirements before each ride
- Tread Lightly! — North American stewardship organization with ATV-specific guidance on noise, stream crossings, and sensitive area avoidance
- ATV Safety Institute / ATV RiderCourse — formal training combining online modules and hands-on skills; recommended for new riders and anyone returning after a long break
- ATV Safety (Before They Ride) — concise pre-ride safety checklist covering PPE standards, age rules, and passenger restrictions
Sources
Recommended
- ATV-UTV TEK Clearview / Elite Rearview mirror adapter - CanAm Triangle – Dirty Birdy Powersports
- ATV-UTV TEK DUST MASK – Dirty Birdy Powersports
- ATV-UTV TEK Can-Am X3 / Northstar - Clearview / Elite Sideview Mirror – Dirty Birdy Powersports
- ATV-UTV TEK Elite Series ATV Cam Lock – Dirty Birdy Powersports