

A safe ATV towing setup starts with one non-negotiable rule: your total payload, which means rider weight, accessories, cargo, and trailer tongue weight combined, must never exceed your ATV’s rated maximum capacity. Get that wrong and nothing else you do matters.
Before you touch a hitch or strap, run through this checklist:
- Confirm your ATV’s maximum weight capacity from the owner’s manual
- Use a rated hitch receiver and matching ball size (1 7/8" or 2")
- Keep tongue weight within the commonly recommended front-loading guideline
- Secure with a four-point ratchet-strap method anchored to frame points
- Verify trailer lights, brake function, and safety chains
- Adjust rear suspension preload for added tongue weight
- Recheck all connections after the first few miles
The CPSC recommends following manufacturer instructions and safe loading practices on every trip. Your owner’s manual is the controlling document, not forum advice.
Key Takeaways
A safe ATV towing setup requires staying within your ATV’s total payload rating, using rated hardware at every connection point, and rechecking the load after the first few miles.
| Point | Details |
|---|---|
| Respect total payload | Rider, accessories, cargo, and tongue weight combined must stay under the ATV’s rated maximum. |
| Match hitch and ball exactly | Use a 1 7/8" or 2" ball that matches the coupler precisely; a mismatch causes coupler failure. |
| Apply the 60/40 loading rule | Position 60% of trailer weight toward the front to produce stable tongue weight and reduce sway. |
| Use four-point frame anchoring | Ratchet straps go to solid frame points only; compress suspension slightly and recheck after the first few miles. |
| Dirtybirdypowersports towing gear | Rated hitches, mirrors, and traction tires are available with fitment guidance from riders who tow. |
Table of Contents
- What gear do you need before setting up an ATV tow rig?
- How do you choose and mount the right hitch for your ATV?
- Why does tongue weight matter, and how do you measure it?
- Step-by-step: how to load and secure an ATV on a trailer
- Which trailer type suits your ATV, and how do you prep it?
- How should you adjust your ATV’s suspension for towing?
- How does towing change the way you drive and brake?
- What should you inspect before and after every tow?
- How long does setup take, and what does towing gear cost?
- What do manufacturer ratings and U.S. law actually require?
- Do you need towing mirrors when hauling with an ATV?
- When do you need trailer brakes, and how do you check them?
- Why safety chains are non-negotiable
- What to do when something goes wrong on the road
- What dealership techs actually see go wrong
- Dirtybirdypowersports has the towing gear you need, ready to install
- Sources
What gear do you need before setting up an ATV tow rig?
You need more than a hitch ball and a prayer. Before loading anything, confirm you have every piece of hardware below.
Required hardware:
- Rated hitch receiver or bolt-on adapter sized to your ATV’s frame
- Correct hitch ball: 1 7/8" or 2" depending on your coupler (measure, don’t guess)
- Safety chains rated above your trailer’s gross weight
- Locking coupler pin and clip
- Trailer rated above your ATV’s weight, loaded within a safe margin of its capacity
Straps and tools:
- Heavy-duty ratchet straps rated for towing loads, not cargo nets
- Torque wrench and basic hand tools for hitch installation
- Grease pack for coupler and wheel bearings
- Ramps rated for your ATV’s weight
- Spare trailer tire
Brands like CURT and Kolpin offer ATV-specific bolt-on receivers and adapter hardware in standard sizes. For compact hauling, a folding trailer and hitch combo is worth considering if storage space is tight.
Pro Tip: Buy ratchet straps one working-load class above what you expect to use. A strap rated for 3,333 lbs working load costs almost nothing extra and gives you real margin if a strap ages or gets nicked.
How do you choose and mount the right hitch for your ATV?
Not every ATV ships with a receiver hitch. Some come with a simple ball mount welded to the frame; others need a bolt-on adapter. Know which type you have before buying hardware.
Common hitch types for ATVs:
- Bolt-on frame mounts: bolt directly to the ATV’s rear frame rails; the most secure option when installed to spec
- Receiver-style adapters: slide into an existing receiver tube and accept a standard ball mount; easy to swap
- 3-in-1 or multi-purpose mounts: combine receiver, ball, and pintle options in one unit; products like the Reese Towpower 3-Way Trailer Hitch list gross towing weight and tongue weight ratings so you can match hardware to your load
Ball size matters more than most riders think. A 2" ball in a 1 7/8" coupler will rock and eventually fail. A 1 7/8" ball in a 2" coupler is equally dangerous. Match them exactly, every time.
Installation steps:
- Torque all mounting bolts to the manufacturer’s specification, not “snug plus a bit”
- Inspect welds and mounting plates for cracks before first use
- Use rated pins and locking clips, never substitute with wire or zip ties
- Keep hitch extension length within the manufacturer’s stated limit
- Remove the hitch when not towing if your manual recommends it
Never mount a hitch to plastic body panels, rear racks not rated for towing loads, or any point the frame manufacturer has not approved. The TEK Trio HD Adjustable Hitch with 2" ball is one example of an adjustable aftermarket option with a published ball size and rated capacity.
Why does tongue weight matter, and how do you measure it?
Tongue weight is the downward force the trailer coupler exerts on your hitch ball. Too little and the trailer sways. Too much and your front tires lose contact pressure, killing steering response.
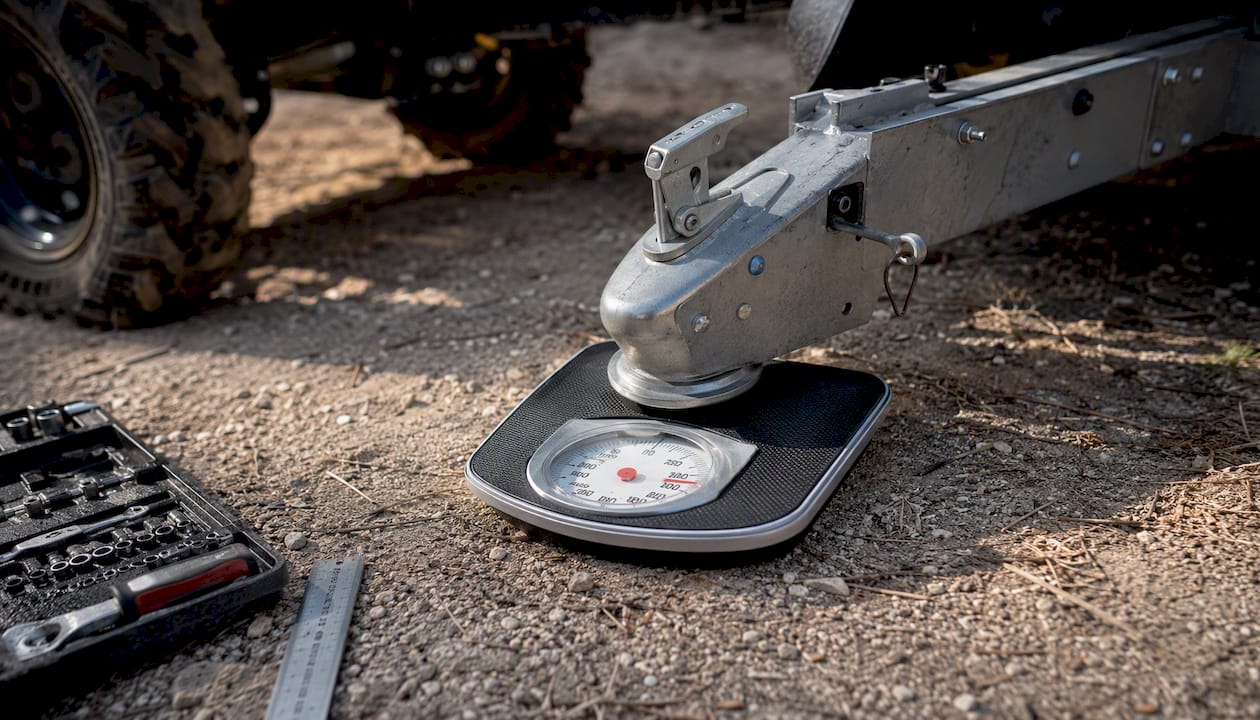
The U-Haul loading guideline recommends positioning roughly 60% of the combined load toward the front of the trailer (tow-vehicle side) and 40% toward the rear. That ratio produces stable tongue weight and reduces the risk of trailer sway at speed.
How to measure tongue weight without a scale:
Place a bathroom scale under the coupler with the trailer level and unhitched. The reading is your tongue weight. For heavier trailers, a dedicated tongue weight scale gives a more accurate reading. Most ATV hitches list a maximum tongue weight in their specs; stay under it.
| Load Element | Where It Counts |
|---|---|
| Rider weight | Against ATV total payload |
| Accessories and rack gear | Against ATV total payload |
| Cargo on trailer | Against trailer GVWR |
| Tongue weight | Against ATV total payload AND hitch rating |
Total payload budgeting is the part most riders skip. As ATV Streets explains, payload is everything, including the rider, and overloading changes suspension geometry, steering, braking, and traction. Keep loads lower than you think you need to.
Pro Tip: If your tongue weight is too high, slide gear rearward in small increments and re-measure. A 6-inch shift in a 400-lb load can change tongue weight by 20–30 lbs.
Step-by-step: how to load and secure an ATV on a trailer
Follow this sequence every time. Skipping steps is how straps get missed.
- Position the trailer on level ground and set the coupler on the hitch ball; lock and pin the coupler.
- Attach safety chains in a crossed X pattern under the coupler before anything else moves.
- Deploy ramps rated for your ATV’s weight; check they are fully seated and locked.
- Check ATV tire pressure and brakes before driving onto the trailer.
- Drive up in low gear or use a winch; keep speed to a crawl.
- Park with the front of the ATV facing the hitch end of the trailer; set the parking brake.
- Attach two forward straps to solid frame points on the front of the ATV, running toward the front tie-down rings on the trailer.
- Attach two rear straps to solid frame points at the rear, running toward the rear tie-down rings.
- Tighten all four straps evenly so the suspension compresses slightly but does not bottom out. Carparts confirms this four-point method anchored to frame points is the correct technique.
- Never anchor straps to axles, suspension arms, or plastic body panels. Those points flex, break, or pull free under load.
- Connect trailer lights and confirm brake lights, running lights, and turn signals work.
- Drive the first 2–3 miles, then pull over and recheck every strap and the coupler before continuing.
Which trailer type suits your ATV, and how do you prep it?
Three trailer categories cover most ATV hauling needs.
Toy haulers offer wide, low-loading ramps and integrated D-ring tie-down points. According to U-Haul’s transport guidance, toy haulers are designed specifically for powersports equipment and improve stability when weight is positioned correctly. The trade-off is size and cost.
Open utility trailers are lighter, cheaper, and easier to store. They work well for a single ATV but require you to add your own tie-down rings if the trailer lacks them. Deck space is usually adequate; ramp quality varies widely.
Deck-over trailers sit higher off the ground and offer a flat, unobstructed deck. They are better suited for multiple machines or UTVs with wider wheelbases. Loading requires taller ramps.
Pre-trip trailer prep checklist:
- Coupler locks onto ball with no play; locking pin is seated
- Safety chains attached and crossed
- Wheel bearings: no grinding, no lateral play, freshly greased per manufacturer interval
- Tires: correct pressure, no cracking or bulging sidewalls
- Lights: running, brake, and turn signals all functional
- Ramps: no cracks, locking pins engaged
- Wiring harness: no bare wires, connector seated and dry
Trailer lighting is a legal requirement in every U.S. state. Check your state DOT for specific rules on trailer brakes, which are often required once trailer weight exceeds a threshold that varies by state.
How should you adjust your ATV’s suspension for towing?
Tongue weight pushes down on the rear of your ATV. Without adjustment, the front end rises, reducing steering authority and braking grip on the front tires.
Rear spring preload: increase it by the amount your manual specifies for heavy loads. Most adjustable shocks have a preload collar you turn by hand or with a spanner. Firming up damping on the rear shock reduces squat under load and keeps the chassis level.
Tire pressure: add 2–3 PSI to the rear tires when towing near maximum capacity. Check your manual first; some models specify towing tire pressures directly.
What to avoid:
- Maxing out preload beyond the manufacturer’s recommended range; it transfers stress to shock mounts and linkage
- Ignoring front tire pressure; a level chassis still needs front tires at spec for steering feel
- Skipping a suspension bushing inspection before a long tow; worn bushings amplify trailer-induced oscillation
Pro Tip: After any heavy towing session, retorque your hitch mounting bolts and check suspension linkage fasteners. Vibration from a loaded trailer works hardware loose faster than trail riding does.
An adjustable UTV bed rack can help distribute rack-mounted gear more evenly, reducing the rear-biased loading that forces aggressive preload adjustments.
How does towing change the way you drive and brake?
A loaded trailer behind an ATV behaves nothing like riding solo. The physics are different and the margin for error is smaller.
Driving rules:
- Use low range for all towing; it protects the CVT belt and gives you engine braking on descents
- Keep speed conservative; manufacturer guidance typically caps ATV towing speeds well below highway limits
- Double your following distance; stopping distance increases significantly with a loaded trailer behind you
- Avoid sudden steering inputs; they initiate sway that compounds quickly at speed
Responding to trailer sway:
Ease off the throttle gradually. Do not brake hard or steer sharply to correct. If sway continues after slowing, pull over and inspect the load. Sway almost always means the tongue weight is too light or the load has shifted rearward.
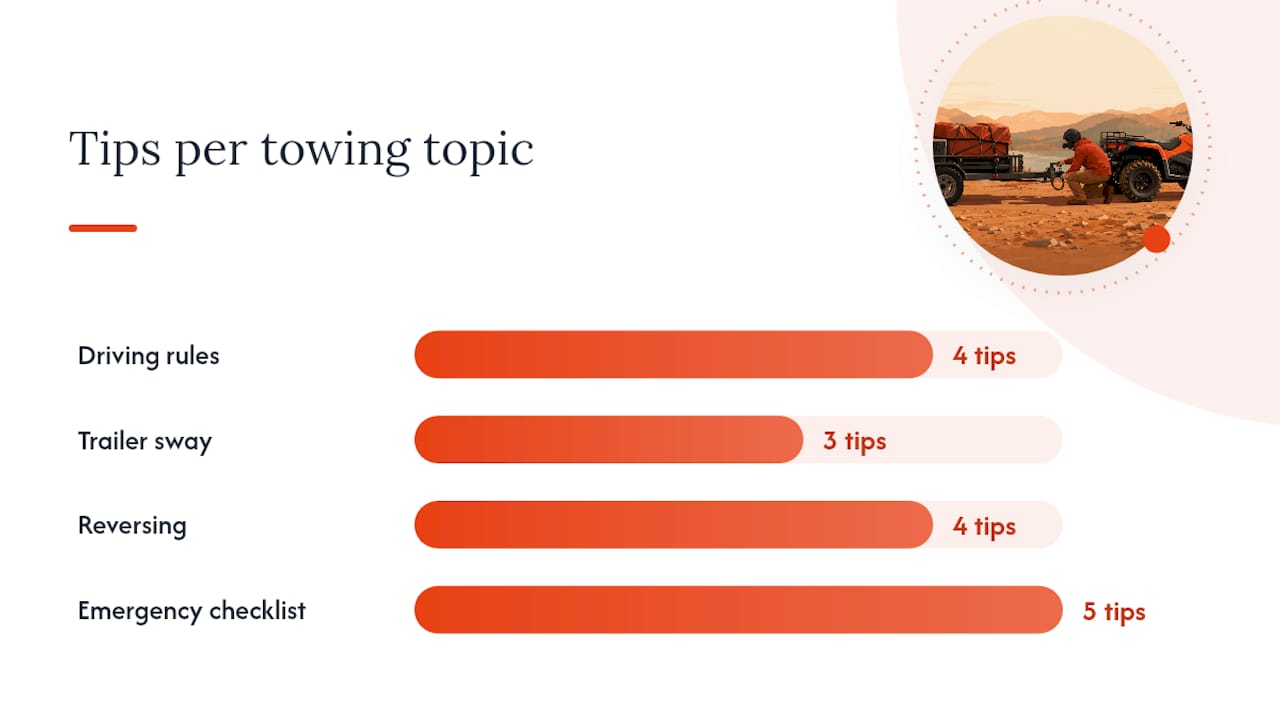
Reversing with a trailer:
Practice in an empty parking lot before you need to do it on a trail. The technique: make small handlebar inputs in the opposite direction you want the trailer to go. Keep inputs tiny. A rearview mirror helps enormously here.
Emergency roadside checklist:
- Pull off the road completely; do not stop on a shoulder if avoidable
- Set the parking brake and chock the trailer wheels
- Inspect the coupler, chains, and all four straps
- Check for shifted cargo and correct tongue weight before continuing
- If a strap is damaged, do not continue until it is replaced
What should you inspect before and after every tow?
A pre-trip inspection takes about 10 minutes. Skipping it costs far more than that.
Pre-trip ATV checks:
- Brakes: firm lever feel, no dragging
- Tires: correct pressure, no damage
- Hitch mounting bolts: torqued to spec
- CVT belt: no fraying or glazing from the last tow session
- Fluid levels: brake fluid and engine oil
Pre-trip trailer checks:
- Coupler: locked, pinned, no play on the ball
- Safety chains: attached, crossed, no kinks or broken links
- Lights: all circuits functional
- Wheel bearings: spin freely, no heat after a short test roll
- Ratchet straps: no fraying, hooks seated fully
Maintenance intervals:
Repack or inspect trailer wheel bearings every season or per the trailer manufacturer’s interval, whichever comes first. Replace ratchet straps at the first sign of fraying webbing or a hook that no longer locks cleanly. Never tow with a coupler that shows visible wear or a latch that does not click positively.
How long does setup take, and what does towing gear cost?
Time estimates:
- Hitch installation (bolt-on): 30–60 minutes with basic tools
- Pre-trip inspection: 10–15 minutes
- Loading and securing: 15–20 minutes
- First-mile recheck stop: 5 minutes
Typical cost ranges:
- Rated bolt-on hitch or receiver adapter: $40–$150
- Ratchet strap set (4-pack, towing-rated): $25–$60
- Aluminum loading ramps (pair): $80–$200
- Utility trailer (open, basic): $800–$2,500
- Toy hauler trailer: $2,500–$8,000+
- Trailer lighting kit: $20–$80
- Safety chains (pair, rated): $15–$40
Where to spend and where to save: buy rated hardware for hitches, straps, and safety chains. Those components are the last line between your ATV and the road. A hitch-mounted carrier with integrated rear lights, like the MOCKINS XXL Hitch Carrier with Rear Lights, is a cost-effective alternative to a full trailer for lighter loads. Save money on the trailer itself if an open utility trailer meets your needs.
What do manufacturer ratings and U.S. law actually require?
Your owner’s manual contains four numbers you need to know before towing anything:
- Maximum weight capacity: the total of rider, accessories, cargo, and tongue weight combined
- Rack capacity: separate front and rear limits for mounted gear
- Hitch tongue weight capacity: maximum downward force on the hitch ball
- Towing rating: maximum trailer weight the ATV is rated to pull
Polaris’s towing guidance is explicit: never exceed the maximum weight capacity, and note that some high-performance models are not recommended for towing at all. That warning applies across manufacturers. Check your specific model before buying a trailer.
Critical safety warning: Exceeding your ATV’s rated tongue weight or mounting a hitch to a non-rated point can void your warranty and cause catastrophic hitch failure at speed. A failed hitch at 25 mph with a loaded trailer behind you is not a recoverable situation. Use rated hardware, torqued to spec, every time.
U.S. legal considerations:
Trailer lighting requirements are federal minimums, but brake requirements vary by state. Many states require trailer brakes once the trailer’s gross weight exceeds 1,500–3,000 lbs, depending on the state. Check your state DOT before towing on public roads. A street-legal lighting kit can help meet running-light requirements for the tow vehicle itself.
Do you need towing mirrors when hauling with an ATV?
Most ATVs and UTVs have limited rearward visibility even without a trailer. Add a 6-foot-wide utility trailer and the blind spot behind you grows substantially.
A wide-angle rearview mirror mounted to the roll cage or handlebars is the most practical fix. The ATV-UTV TEK Clearview Center Mirror gives a broad rear field of view and is a high-priority upgrade for anyone towing regularly. For model-specific fitment, the Polaris Ranger Rearview Mirror and Visor Adapter integrates cleanly without blocking forward sightlines.
On open utility trailers, the trailer itself sits low enough that a standard mirror often covers it. Enclosed toy haulers are a different story; their height blocks the mirror’s view entirely, and a camera system or spotter becomes necessary for reversing in tight spaces.
When do you need trailer brakes, and how do you check them?
For light utility trailers under 1,500 lbs loaded weight, most ATVs can manage stopping without trailer brakes, though stopping distances still increase. Once trailer weight climbs above that threshold, or when towing on grades, electric or surge trailer brakes become important for safe stops.
Surge brakes activate automatically when the tow vehicle decelerates; the trailer’s inertia pushes the coupler forward, triggering the brake master cylinder. No wiring to the ATV is required, which makes them popular for ATV applications.
Electric brakes require a brake controller wired to the tow vehicle. Most ATVs do not have a factory brake controller output, so installation requires an aftermarket wiring harness. Check whether your ATV’s electrical system can support the additional draw before installing.
Checking trailer brakes before a trip:
- Surge brakes: inspect the coupler actuator for corrosion and free movement; check brake fluid level in the master cylinder
- Electric brakes: test the controller output with a multimeter; inspect brake magnets for wear
- Both types: check brake adjustment and confirm the breakaway cable is attached to the tow vehicle, not the trailer frame
Why safety chains are non-negotiable
Safety chains are the backup system that keeps a separated trailer from becoming a projectile. They are also legally required in every U.S. state for trailers towed on public roads.
Selecting chains: chains must be rated above the trailer’s gross weight. Look for Grade 30 or higher proof coil chain with a working load limit that exceeds your trailer’s loaded weight. Lightweight decorative chains sold at some retailers are not rated for towing.
Attachment method: cross the chains in an X pattern under the coupler. This cradles the coupler if it separates from the ball and prevents the trailer tongue from digging into the road. Leave enough slack for turns but not so much that the chains drag.
Legal requirements: most states require two chains, crossed, attached to the tow vehicle’s frame or a rated hitch receiver, not to the ball mount itself. Attachment to the ball mount means both the ball and the chains fail together if the mount fails.
What to do when something goes wrong on the road
Trailer emergencies happen fast. Knowing the response before you need it is the difference between a controlled stop and a crash.
Trailer sway: ease off the throttle smoothly. Do not brake hard. Steer straight. Let the ATV slow naturally until the sway dampens. If sway returns after you resume speed, stop and rebalance the load.
Breakaway systems: if your trailer has an electric brake system, it should include a breakaway cable clipped to the tow vehicle. If the trailer separates, the cable pulls a pin that activates the trailer brakes independently, stopping the trailer before it can travel far. Test the breakaway battery annually; a dead battery means the system does nothing when you need it.
Coupler separation: safety chains catch the trailer. Pull over immediately, do not attempt to reconnect while on a road with traffic. Inspect the coupler latch, ball size match, and pin before reconnecting.
Blown trailer tire: hold the ATV steady, ease off throttle, and pull over gradually. Do not brake hard; a blown trailer tire causes the trailer to pull to one side and hard braking amplifies it. Carry a spare and the tools to change it.
What dealership techs actually see go wrong
The most common towing mistake techs at Dirtybirdypowersports see is riders who skip the tongue weight check entirely. They load the trailer, hook up, and drive. The trailer sways, the front end feels light, and they assume the ATV is just “not great at towing.” Usually the fix is moving 40 lbs of gear 12 inches forward.
The second most common issue is straps anchored to the wrong points. Axle tubes, suspension links, and plastic fender brackets all get used as tie-down points. After a rough road, the strap has either cut into a component or pulled free. Frame rails and dedicated tie-down loops are the only acceptable anchor points.
A practical tip from the service bay: after installing a new hitch or completing a first tow, retorque every mounting bolt. Vibration from a loaded trailer settles hardware in ways that trail riding does not. It takes five minutes and prevents a hitch from walking loose over the season.
Dirtybirdypowersports has the towing gear you need, ready to install
Getting your ATV tow rig right means having hardware that is actually rated for the job, not whatever was cheapest at the hardware store. Dirtybirdypowersports carries rated hitch mounts, adjustable receivers, visibility upgrades, and lighting kits chosen specifically for ATV and UTV applications, backed by riders who use this equipment themselves.

The ATV-UTV TEK Clearview UTV Center Mirror is one of the highest-priority upgrades for towing, and it ships ready to install. For traction on rough terrain while towing, Braven Berserker M/T radials give you the grip to pull a loaded trailer through conditions where street tires lose confidence. Browse the full accessories lineup or reach out directly at Dirtybirdypowersports to confirm fitment for your specific machine before you order.
Sources
- How To Safely Transport ATVs And Off-Road Vehicles - U-Haul
- Carparts
- ATV Safety Information Center - U.S. Consumer Product Safety Commission (CPSC)
- ATV towing & hauling guide: load ratings, racks, trailers, and payload safety - ATV Streets